Overhauling the Sega Astro City – Part 2, audio amplification and fans
I’ve already got the ball rolling in part 1 of this series, so let’s move on to part 2 – audio amplification and fans.
In line with the previous post, I want to add a way to have a stereo amp in the cabinet to take care of line-level sources and enhanced stereo sound (e.g. Naomi, CPS-II, Sega Model 3, etc). So, in the spirit of making the cab as universal as possible, I need to look at adding in a small amp that can be switched on or off as required, and be able to direct either amplified sound off the JAMMA cable or amplified stereo output as required. So, this is what I’ve come up with:
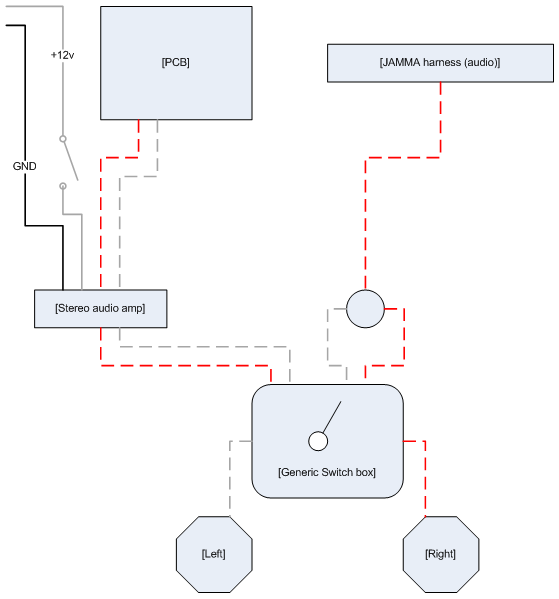
It’s not all the difficult – I’ll need to rewire the 4-pin connector that goes from the speakers at the top of the cab so that they’re separated into stereo channels, then create a little switch to roll between a split dual-mono amplified output (from the JAMMA harness) or stereo output from the stereo amp, which in turn is powered off a 12v source (with switch to control when it’s on) and grabs its input directly from the PCB (Naomi, Model 2, etc).
This then means the audio can be setup in the cab when inserting a new board. All I’ll need are a pair of stereo RCA cables to run form the CPS-II or Naomi boards (and make a stereo RCA adapter for the Model 2/Model 3 boards) and run them off a pair of 12v mono amps I already have around the place, and I should be good to go.
The other addition I’d like to add is a stereo controller I can mount on the cab to adjust the output before it goes to the speakers as required – there’s currently a cheap knob the previous op added to give this kind of functionality, but it’s not a true stereo actuator, and doesn’t do much except distort the audio 😛
Of course, the great thing with this setup is that it won’t cost much at all to add this kind of functionality. To make it clean though, I’ll plonk the lot into a small project box and mount everything inside it. This way, I can use the same project box to run a 12v switch to selectively power the 12v fan I got with my Model 3 kit before. And to make sure I don’t mangle my hand again, I’ll also grab a pair of 120mm fan guards to avoid any more stupidity 🙂
Thus ends part 2 – part 3 will deal with the lovely scope creep and deciding what to do with my monitor 😀
To keep track of the whole project, just use the Sega Astro City Overhaul tag – the whole series will be added to it over time.


And wake up cuffed to a hospital bed if lucky.