Sonic Generations continues to pique my interest

I continue to be impressed by the refreshing direction Sega are taking with Sonic Generations – I’ve talked before about my initial excitement, but the latest E3 trailer seems to be marrying the concept of “old and new” with some success, at least as far as demo footage is concerned:

I’m worried about getting excited about a new Sonic game – Sonic Unleashed was an awful concept and Sonic 4 was flawed, but watching the 2D portion of that video just looked so good! Then Kris over at Silicon Era gave a great write-up of some hands-on with the game, and this continues to feed my proverbial fires of excitement about this game.

But I continue to be tentative. Old fart gamers like myself have a troubled history in trying to adapt to Sonic in 3D (despite genuinely liking the Dreamcast games back when they first came out), so you’ll have to excuse my skepticism. Skepticism that’s tempered by enthusiasm, but a skeptic I remain nonetheless.

The trailer above assures me we’ll see the game later on this year. Let’s see what the next few months bring, then.

Props to Silicon Era for linking the E3 trailer in with their recent piece on the game, as I’d missed it in my previous trawling.

Getting the Xbox EEPROM serial reader working on v1.6 machines

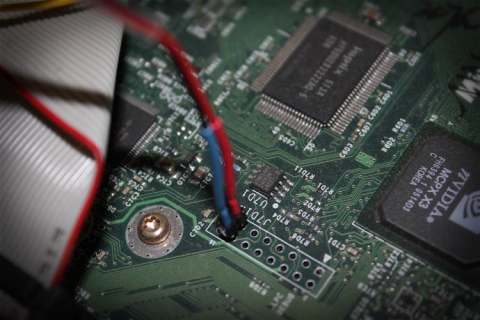
I recently picked up an Xbox I wanted to softmod and was having trouble doing the HDD swap – I was really only interested in opening the machine up to function as a media player and to copy all my purchased games to the HDD because I’m lazy (:P) so I wanted to softmod the machine. Someone mentioned I could give the Xbox serial reader solution a whirl – the kit contains a 2-prong probe that sits in socket pins 13 and 14, an alligator clip to connect to the shielding to get a GND connection and a little IC attached to an RS232/serial port connection.

The only problem with this is that v1.6 Xboxes act a bit funny when you use it! The Xbox fan speeds up something crazy and the machine turns itself off when you power it on with the serial socket connected to the serial port. After doing some research on Whirlpool, it turns out you have a very small window to read the machine’s EEPROM with your machine, you just have to be fast. Thanks to Ads79 for the info!

Disclaimer

You mod your machine at your own risk. Myself nor anyone else is responsible for YOU modding YOUR Xbox. If your machine doesn’t work as a result of this, don’t blame me – you do this mod at your own risk.

Using my WinXP machine turned off, I inserted the serial device into the serial socket and connected the probes and ground clip to the Xbox, but with the Xbox powered off, and turned on the PC, installed and loaded/configured PonyProg. Here’s where you have to be tricky!

With PonyProg open, disconnect the serial device from the PC and turn on the Xbox and let it load past the flubber sequence. With your mouse hovered over the “Read EEPROM” icon, connect the serial device to your PC, hit the icon as soon as it’s connected (the Xbox’s fan will speed up!), and you should be able to get it read before the machine powers off. You have a window of perhaps 3-6 seconds.

Save the EEPROM binary image, then proceed to softmod your machine (or recover your machine if it’s dead) via your preferred method.

Easy as that.

Is your TV 240p compatible?

I’ve discussed before about using RGB to Component transcoders on old consoles to get the beautiful RGB video signal into something TVs with component inputs can handle. What didn’t occur to me at the time was TV compatibility.

Now, I primarily use an old 68cm CRT TV for my retro gaming, and my beloved Hitachi is kind enough to have component input (one of the main reasons I bought it back in… 2002). However, someone got in touch with me a while back saying they were having issues with playing games from the transcoder through their HD LCD TV. Turns out their set doesn’t support 240p via component, and as the transcoder outputs a 240p component signal, they were out of luck.

At first I thought it was unusual, as I hadn’t had any issues running it on my CRT TV, and our Sony Bravia HDTV (late-2007 model Bravia X) didn’t skip a beat with the unit, either. However, after looking into the issue, it seems they weren’t alone, and Samsung panels in particular seem cranky about working with 240p signals. Bummer.

So, how do you test your panel’s compatibility and what are your options? I’m no expert, but I’d suggest that if you have a Wii, change the Virtual Console to output in 240p and see what happens. Aside from that, I don’t know too many consoles that can do 240p and output component video natively. If you have a Playstation 2 and a set of component cables, you have a couple of choices:

  • Fire up one of the Sega Ages releases that contain Mega Drive or Master System games and change the display settings in-game to 240p. I know this option exists for Phantasy Star Complete Collection, Gunstar Heroes Treasure Box and Monster World Collection.
  • Load up Ico and see what happens (must be running in 60hz, the PAL version will give you the option)
  • All PSone games running out of the PS2 apparently run in 240p also (I’m assuming this only counts for NTSC games, not PAL titles), so give that a try

Props to this thread at HDTV Arcade for the latter two options, as I didn’t realise PSone titles and Ico ran at 240p, I assumed both still ran at 480i or 576i.

So, assuming your TV struggles with a 240p component video signal, what are your options? Thankfully, there are some, but I can’t take credit for that info – Tobias “Fudoh” Reich has an amazing entry on it at Deinterlacing, Scaling, Processing: Classic videogame systems on LCD and Plasma screens. His article has an amazing roundup of equipment and technical info on achieving low-res beauty on HDTVs that get cranky with 240p signals (and while you’re there, you should also read his excellent piece, Scanlines Demystified, with lots of beautiful shots of low res displays), and will hopefully point you in the right direction.

Hopefully this will help others who have encountered the same problem. Mind, none of these workarounds would be necessary if HDTV manufacturers made their devices 240p compatible, so shop around wisely, check to see if your intended purchase will support 240p via component and ask questions of the manufacturer before buying your TV.
The Last Gamer – essential viewing and reading

Just thought I’d plug a fellow gamer’s amazing series of videos and the recently announced website, Last Gamer.

The first video I saw by Joel was his Afterburner review, where he took us through the various ports of Afterburner over the years, and then finishes off with the amazing Afterburner 2 DX cab. But don’t take my word for it, take his:

His latest round of videos have documented, from start to finish, the building and move-in of his new console games room, and the thing is magnificent to behold! And because I’m such a nice guy, here they are in order:

Oh, and be sure to checkout the Q&A session for a great story about his early days running an import store and an amazing phone call with Capcom Japan 🙂

Well done on the amazing job done Joel, and congrats on getting the website up! Looking forward to the impending video, as it’s going to involve what might be my favourite console – the Saturn 😉

Overhauling the Sega Astro City – Part 13, final thoughts

Wow, who would have thought I’d actually get to this post, let alone finishing the project?

Well, the project was actually finished up a few months back, but I’m glad I got this post in there to round things off. This was a pretty big undertaking for me since it was my first arcade cabinet overhaul, and I have to say it went really well. The cabinet’s running beautifully and is happily playing anything I can throw at it. Once I have my Naomi IO and get around to building a converter for Model 2/Model 3 boards, I’ll be absolutely done.

So, with all this experience in mind, would I have done anything all that differently?

To be honest, not much went awry – I’m happy with the end result, and there have been no dramas with the setup. The only changes I’ll be making is that I’ll be splicing in button 4 for players 1 and 2 from the JAMMA harness into the JAMMA+ harness wiring to save swapping connections, but that’s it.

Thanks for sticking with this series of posts – if you want to check out the whole series there’s the Sega Astro City Overhaul tag, but for convenience, here’s the full listing:

Big thanks to the Aussie Arcade crew for helping with some daft questions throughout the process, it’s an amazing community of enthusiasts over there!

Now with this one sorted, I’ll have to see what my next project entails!