Overhauling the Sega Astro City – Part 1, power supplies
I’ve been meaning to write something up on this long-winded project for a while now, so here I go – not sure how many parts there’ll be to this job, so we’ll just have to wait and see 🙂
I’ve recently been looking at the existing setup inside my Astro, and can’t help but feel that it needs some work. The wiring is a bit of a rat’s next at times, I don’t know where all the cabling’s going, I’ve had to beef up to wiring on the 5v connections to increase the PSU’s output, the PSU itself is on the way out, as is the existing arcade monitor.
Where things got to a bit of a head was with regards to power issues – I’ve recently grabbed a Naomi and currently have a couple of Model 2 and Model 3 boards that need a reasonable amount of juice on tap. So, I figured that maybe I should investigate rewiring the way the power supply worked. The problem here was finding a power supply that couple happily take everything from a mid-80s PCB all the way through to resource-hungry Model 3 and Naomi setups. This left me with two options:
Option 1 – Parallel PSUs
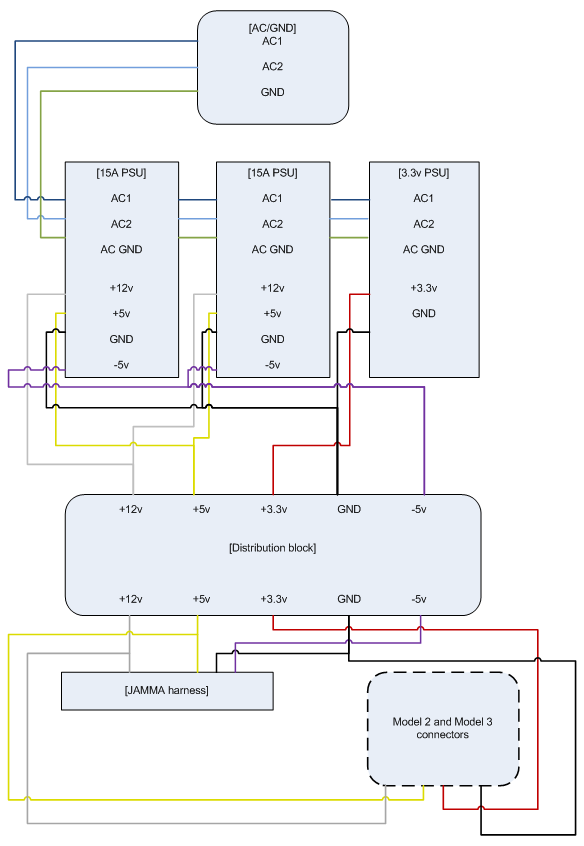
In this case, I’m taking the 240v AC supply, chaining it across my existing 15A arcade PSU, chaining it to another 15A PSU and finally chaining it to a 3.3v PSU I bought a while back. From here, I then wire it to a distribution block, which connect to suit Naomi, Model 2/3 or JAMMA.
The pros with this is that all I need is another PSU (cheap and accessible), it runs off 240v (no need to run it through the transformer), and doesn’t require too much tomfoolery.
However, against this is – will it actually work on games that need a full load? What if one fails? Is it really safe to be mixing too PSUs together to get this kind of power distribution.
This then leads to option 2:
Option 2 – Dedicated PSU

In this case, the aim is to grab a Sega Sun power supply, since they are great pieces of kit and are certified to power anything you can throw at them.
There are some challenges with this – cost (they’re more expensive and more difficult to get locally), only 110v (therefore would require some extra work on hooking it into the transformer), no -5v output.
In the end though, I decided to go for the above setup – fork out the extra for the PSU, grab a Negatron to introduce a true -5v connection where necessary for older boards, and run them all off a distribution block.
However, after chatting with some more experienced arcade builders, I decided to change the model a little – instead of having a big distribution block, I decided to simply create a handful of male JST plugs for each connection (e.g. JAMMA, Model 2/3 and use standard cabling for the Naomi) and hook them directly into the JST power plugs on the PSU. The following is the final run:
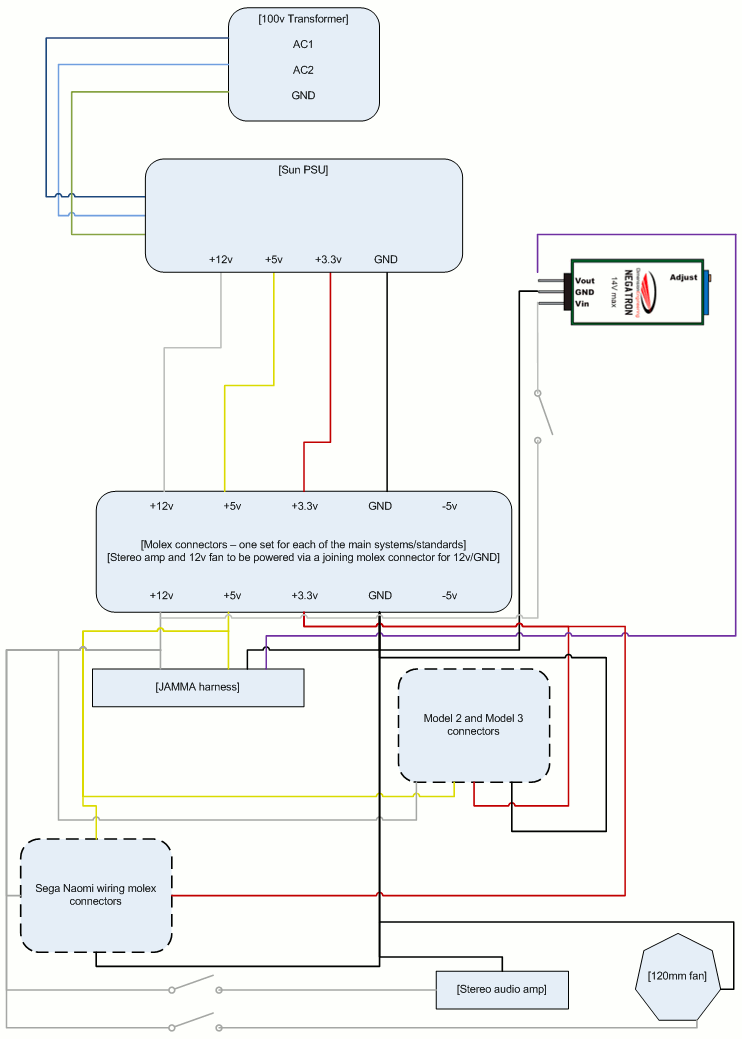
So, I figured if I was going to start rewiring some areas of the cabinet to accomodate the PSU and make the whole setup more universal, there are two other factors to consider – amplification for line-level sources and getting the 12v fan from the Model 3 setup up and running when needed – you’ll see these (as well as switches to accomodate them and the Negatron when needed) have been added to the above diagram.
But I’ll stop here before I get too carried away – part 2 will deal with more of the planning behind this project.
To keep track of the whole project, just use the Sega Astro City Overhaul tag – the whole series will be added to it over time.


